Admin Reference Guide for Saudi Arabia Railways

Written by Cameron Arney
Updated at November 12th, 2024
Table of Contents

This guide covers some of the main functions for Champions and Admins of Safe365.
Working In Reports
Some of the common functions you will need to do when users submit reports from the Safe365 App.
Adding Notes to a Report
Notes can be added to any report, to keep everyone updated with any work that is being carried out.
How to add Notes to a report:
- Navigate to the Performance Dashboard.
- Click into the Report you need to make a note on.
- Under the 'Notes' section, click ‘Add New’.
- Enter the information and click the ‘Tick’.
The note will be saved with a timestamp.
Create an Action within a Report
Safe365's Action feature is available throughout the entire platform. When investigating a Report you may find some follow up Actions need to be taken, this feature will allow you to notify other Users in your Safe365 account to complete tasks.
How to add Actions within a Report:
- Navigate to the Performance Dashboard
- Click through to the Report.
- Under ‘Actions’, click ‘Add Action’.
- Complete the Action details, and Assign to a User.
- Click ‘Add Action’.
The Action will be saved, and you can view it within the Report, and under Workspace.
Checklists
How to Create a Checklist
Within Safe365 you can create Checklists for anything you require. These can be daily vehicle or machinery checklists, or monthly office or safety checks, through to inductions.
Checklists can be completed from the Safe365 app, and can be accessed from within the app, or via QR codes.
Checklist Answer Types Explained
Checklist Answer Types Explained
There are a range of Answer types you can use within your checklist. We explain each type below.
All checklist answers have the ‘Additional Information’ section where the user can enter in extra or supplementary information as required.
Yes/No
This is a simple Yes/No option.
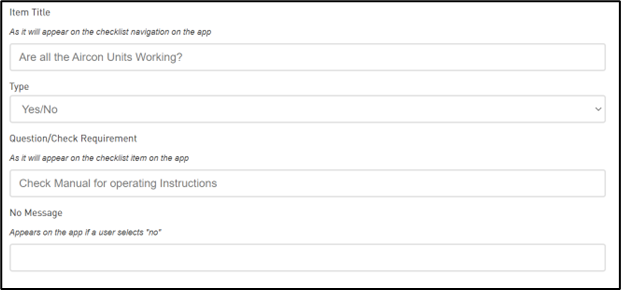 |
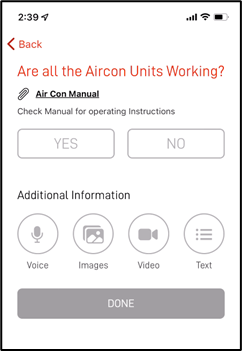 |
Yes/No with Escalation on No response
This uses the escalation functionality when a No answer is selected. This is activated by adding a No Meaage when creating the checklist. Where a user selects No, it will prompt an email to be sent to the Escalation Notification group, and display the No Message
Safe/Unsafe
This gives the user the options of Safe and Unsafe.
When a user selects Unsafe, it will prompt an email to be sent to the Escalation Notification group and also display the Unsafe message.
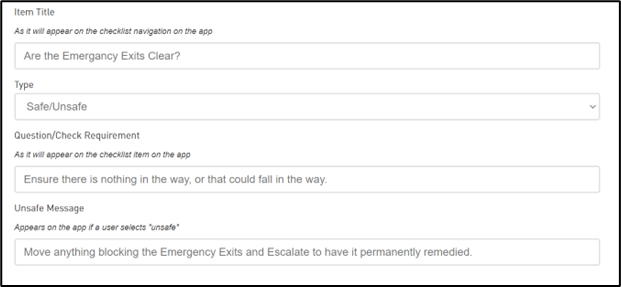 |
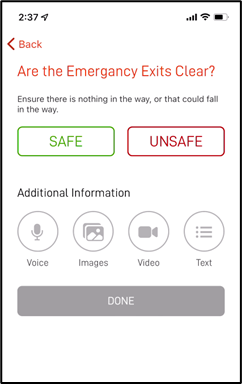 |
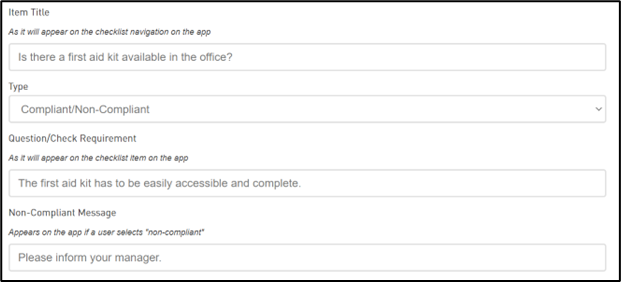
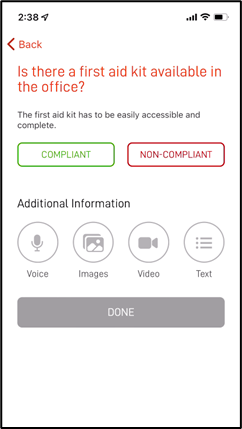
Compliant/Non-Compliant
This gives the user the options of Compliant and Non-Compliant. Where a user selects Non-Compliant, it will prompt an email to be sent to the Escalation Notification group, and also display the Non-Compliant message
 |
 |
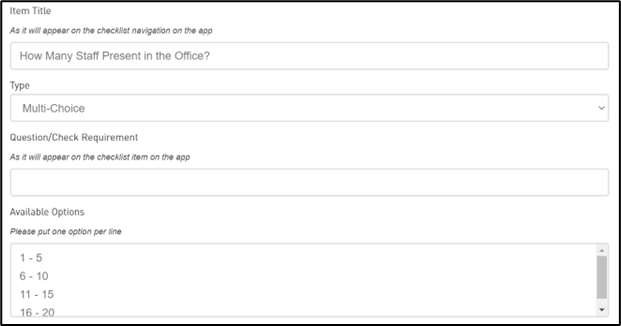
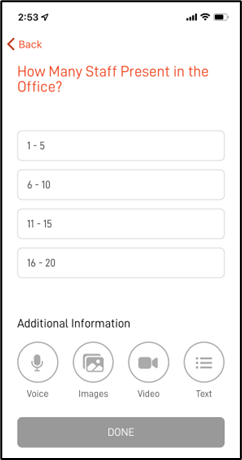
Multi-Choice
This gives the user a list of options to select from, where only one option can be picked.
There must be options available, or the checklist will not be able to be completed.
 |
 |
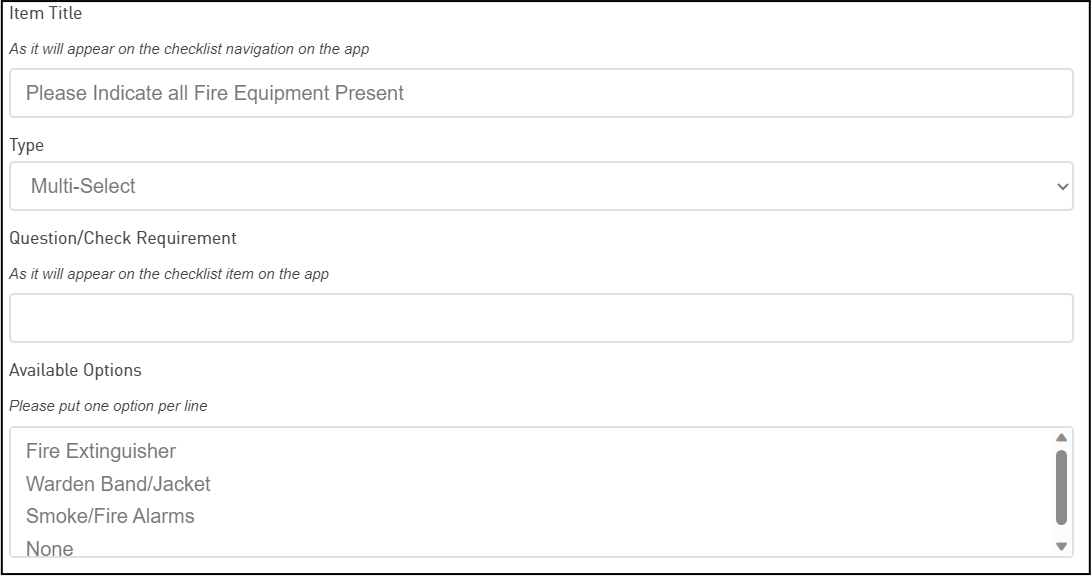
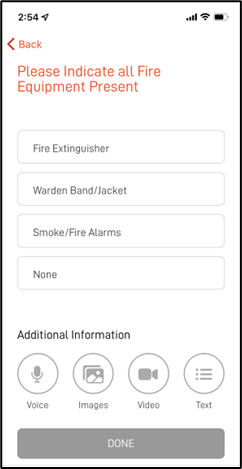
Multi-Select
This gives the user a list of options to select from, where multiple options can be selected
There must be options available, or the checklist will not be able to be completed.
 |
 |
Text/Audio/Image/Video
This requires the user to answer the question with the respective option.
To Create a checklist:
- Head to the Performance Dashboard.
- Click into Checklists.
- Click 'Add New +'.
- Enter a Title for the Checklist, and a Description if required.
- Under ‘Checklist Content’ click ‘+ Add New’.
- Enter the Title of the question or check.
- Select the 'Type'. Refer to Checklist Answer Types Explained for more information.
- Enter addition context or requirements for the check/question.
- Click the ‘Tick’ to confirm the question.
- Repeat to load in all your questions.
- Click ‘Save’.
When the Checklist is ready to be used, Activate the Checklist to make it available within the App.
- On the Checklist, click on ‘Options’.
- Click ‘Activate’.
Create a QR Code for a Checklist
Once you've created a checklist on the web-console you can download a QR code for the checklist. When scanned on the Safe365 mobile app, the selected checklist will automatically pop up on the users mobile app.
How to create a QR code for a Checklist:
- Navigate to the Performance Dashboard.
- Click into Checklists.
- On the Checklist you need a QR code for, click ‘Options’.
- Click ‘Download QR Code’.
You will now have a download of the QR code for the checklist. Stick this on the wall around the workplace and when someone scans the QR code using the Safe365 mobile app scanner the checklist will automatically pop up for them.
The Safe365 App
Using the Safe365 App
Download the Safe365 App
The Safe365 App can be downloaded from the Google Play, or Apple App Store. Search for Safe365 and look for the icon above.
If you are on your phone, click on the link you need below:
Submit an Incident Report from the Safe365 App
An Incident report should be submitted after anything happens to incur injury or harm within the Workplace.
Complete a Checklist on the Safe365 Mobile App
All Safe365 checklists are completed on the mobile app, below is a quick guide of how to do this on the app.
Actions
How to create an Action
How to create an Action:
- Click into ‘Workspace’.
- Click ‘Add Action’.
- Enter a ‘Title’.
- Enter a ‘Description’ explaining what the user needs to do.
- Click on ‘Assignee’ and selecct user/s to assign the Action to.
- If required, enter a ‘Deadline’ and/or 'Priority.
- Click ‘Add Action’.
Completing a Action